

JPEG Image Analysis: A Practical Forensic Guide

A journalist receives a viral JPEG showing an alleged event. The image looks convincing, but the source is unclear, the file has passed through several messaging apps, and an editor wants an answer before publication. Is it an authentic photograph with ordinary platform damage, a human-made composite, a local retouch, or an entirely AI-generated image?
That question rarely has a responsible one-click answer. JPEG image analysis works best as a structured investigation of file history, compression traces, local inconsistencies, visual context, and independent generation signals. The aim isn't to produce false certainty. It's to determine what the file supports, what it weakens, and what remains unknown.
The Reality of Verifying Digital Images
A suspicious image usually arrives without a clean chain of custody. It may have been downloaded from a social platform, captured as a screenshot, resized by a content management system, or exported from editing software before reaching the newsroom or moderation queue. Each transformation can alter the evidence inside the file.
The first mistake is treating visual oddity as proof. A bright patch in an Error Level Analysis result may indicate a pasted object, but it may also reflect ordinary editing or a different compression history. A strange texture may point toward synthetic generation, but repeated recompression can produce its own unusual patterns.
What the analyst is actually trying to establish
A practical examination separates several questions:
- Origin: Does the file contain evidence of a camera or software workflow?
- Integrity: Do different regions appear to share the same compression and editing history?
- Manipulation: Are there signs of splicing, cloning, retouching, or inpainting?
- Generation: Do independent signals support an AI-generated origin?
- Context: Does the image match known photographs, locations, dates, or surrounding claims?
These questions overlap, but they aren't interchangeable. A file can be authentic but heavily processed. It can be generated by AI and later edited by a human. It can contain a real photograph with a synthetic region added through inpainting. Calling every such file merely “fake” discards the distinction that journalists, educators, and trust and safety teams need.
Practical rule: Treat JPEG artifacts as evidence about a file's compression history first. Treat them as evidence of deception only when other findings support that interpretation.
Human-made manipulation still matters. Splicing inserts content from another image, copy-move editing duplicates material within the same image, and localized retouching changes selected areas without rebuilding the entire scene. AI generation introduces a different problem because the image may never have had a camera-originated structure in the first place. AI-assisted edits create a mixed-origin category that can defeat assumptions designed for untouched photographs.
A defensible conclusion therefore sounds more precise than “real” or “fake.” It might state that the file shows localized compression inconsistency, that the image has likely been recompressed, or that the available evidence is insufficient to distinguish generation from aggressive platform processing. That language protects the investigation from overclaiming and gives the next reviewer something reproducible to test.
Decoding JPEG File Structure and Compression Fingerprints
JPEG compression leaves a mathematical trace because the format doesn't treat every pixel as an isolated value. It divides the image into non-overlapping 8×8 pixel blocks, then transform-codes each block using the Discrete Cosine Transform, or DCT. The transform represents visual information as coefficients, separating broad changes such as smooth shading from finer details such as edges and texture.
Quantization then rounds each DCT coefficient according to a quantization table. This reduces precision and makes the file smaller, but it also creates a repeatable fingerprint. Coefficients tend to cluster around multiples of the relevant quantization step, producing comb-like histograms in individual DCT sub-bands.
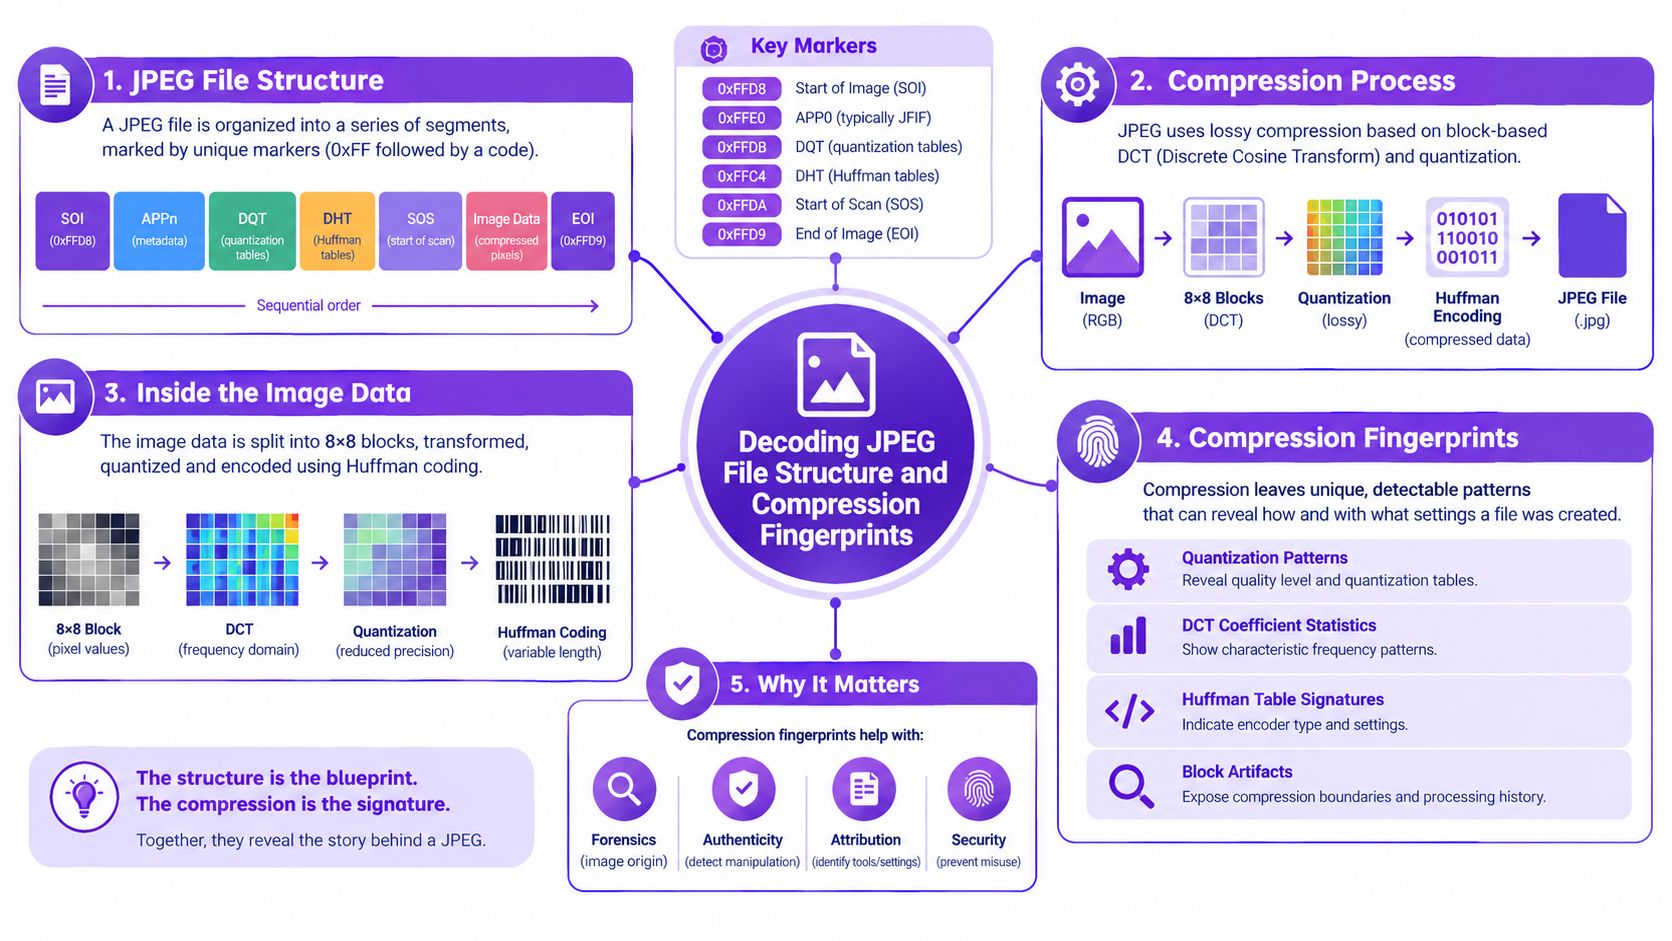
Reading the fingerprint
An analyst generally looks for two related signals:
- Block-boundary discontinuities: Neighboring 8×8 blocks may show slight differences at their borders, especially in areas with edges, sharp detail, or strong compression.
- Quantization patterns: DCT coefficients can form frequency-domain distributions that reveal how the file was encoded.
These patterns establish a baseline for the whole image. A localized region that doesn't fit the surrounding pattern may have a different compression history. That could happen after an insertion, retouching operation, or separate recompression. It doesn't identify the exact action by itself.
Camera manufacturers and imaging software can use different quantization tables, so the tables may provide context about encoding provenance. That context is useful, but it isn't a complete ownership record. A file can be exported, resized, or passed through another application, changing the clues that originally came from the camera.
Metadata is context, not a verdict
EXIF inspection belongs near the beginning of an examination because it can reveal capture and processing context. Analysts may find camera or software identifiers, but missing metadata isn't proof of manipulation. Platforms often remove metadata, and ordinary users may export files in ways that strip it.
The file format also matters. A JPEG stores image data through lossy compression, while a PDF can contain text, vector objects, images, and document structure. For a clear overview of those practical format differences, see this guide to PDF vs JPG differences.
For readers who want a deeper primer on visible JPEG damage, this explanation of image compression artifacts offers useful terminology. The key principle is simple: a JPEG isn't just a picture. It's a record of transformations, and forensic interpretation starts by understanding what those transformations normally leave behind.
Spotting Tampering Through Artifact and Noise Analysis
Once the file's normal compression behavior is understood, the investigation can focus on regions that don't belong to that baseline. Error Level Analysis, often called ELA, resaves the image at a known JPEG setting and compares the result with the supplied file. The output is commonly displayed as a heat map, where areas with different resave behavior appear brighter or otherwise more pronounced.
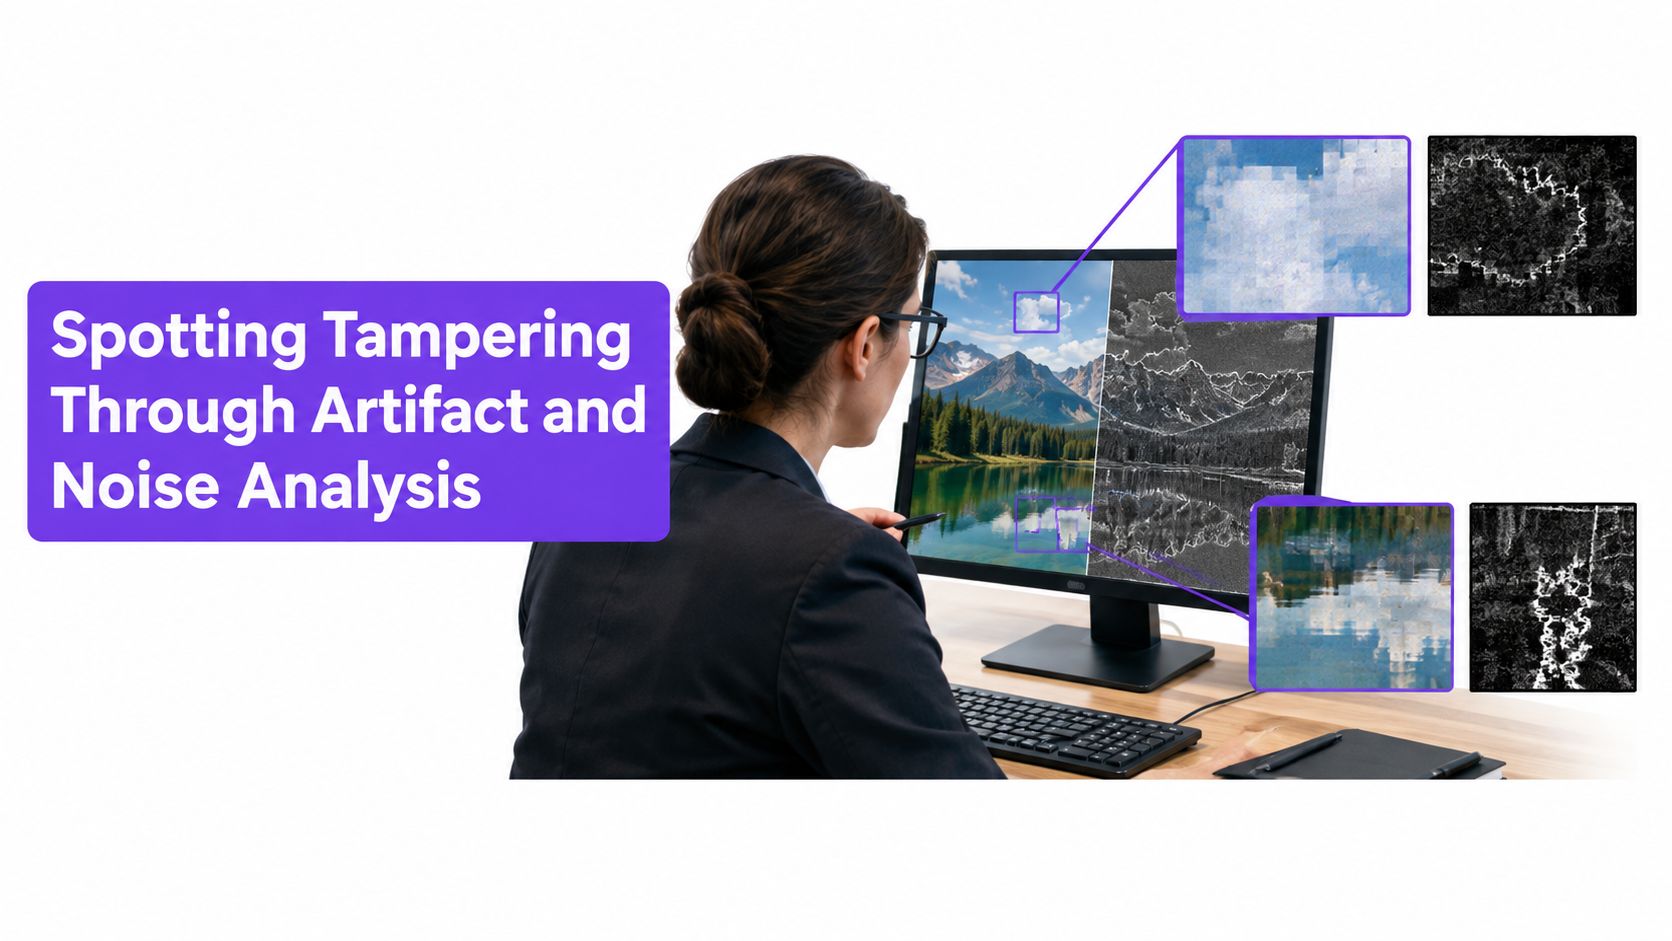
A bright ELA region isn't a verdict. It means that the region behaves differently under the chosen recompression process. Text, high-contrast edges, fine foliage, and areas with naturally complex detail can also stand out. The analyst must compare the suspicious area with visually similar areas elsewhere in the image and inspect whether the pattern follows an object boundary or appears randomly.
Three useful anomaly checks
Block consistency examines whether neighboring regions share comparable JPEG behavior. An inserted patch may retain a different quantization history from the host image, creating a local discontinuity in blocking or DCT statistics.
Noise consistency asks whether texture and sensor-like noise behave coherently across the scene. A pasted region may look too smooth, too sharp, or statistically different from nearby surfaces. Compression can weaken this clue, so it should be treated as supporting evidence rather than a standalone fingerprint.
Structural duplication looks for repeated patches that suggest copy-move editing. A duplicated cloud, object, or texture may remain visually plausible while producing matching local patterns that are unlikely to occur naturally at the same level of detail.
A useful anomaly is not merely “bright.” It is a pattern that remains meaningful after you account for edges, texture, image content, and the file's broader compression history.
Splicing creates another class of inconsistency. The inserted object may carry different edge softness, lighting direction, perspective, or noise behavior from its surroundings. Retouching can create a similar boundary, especially where an editor has removed an object or altered a face. JPEG image analysis helps locate the region, but scene geometry and visual reasoning help determine whether the difference makes sense.
The order of operations matters. Start with the original available file, preserve a working copy, and record every conversion used during examination. Repeatedly opening and saving the image can introduce new artifacts, making later findings harder to interpret. For a practical look at edited-image checks, consult this guide to detecting edited images.
A visual demonstration can help analysts understand how these signals appear in practice:
The strongest conclusion comes from convergence. A localized compression mismatch, unusual noise transition, and implausible object boundary together deserve escalation. Any one of those findings alone may reflect harmless editing.
Distinguishing AI Generation from Standard Compression Artifacts
A newsroom receives a photograph from a social platform, and the face looks slightly synthetic after several rounds of sharing. The file may have been resized, recompressed, screenshotted, or converted between formats. The working question is therefore precise: does the anomaly indicate AI generation, or does it reflect the file's codec history?
Standard JPEG compression can reduce the performance of forensic detectors. Newer neural compression can produce artifacts resembling synthetic imagery or image splicing. Research on JPEG AI also reports weaker performance from existing forensic detectors on JPEG-AI images because neural-compression artifacts can imitate generative traces. Treat unusual texture or frequency behavior as a prompt for investigation, not as proof. The 2025 CVPR workshop research on JPEG AI and forensic detection discusses this limitation. For a technical primer on spectral traces, see this frequency analysis tool overview.
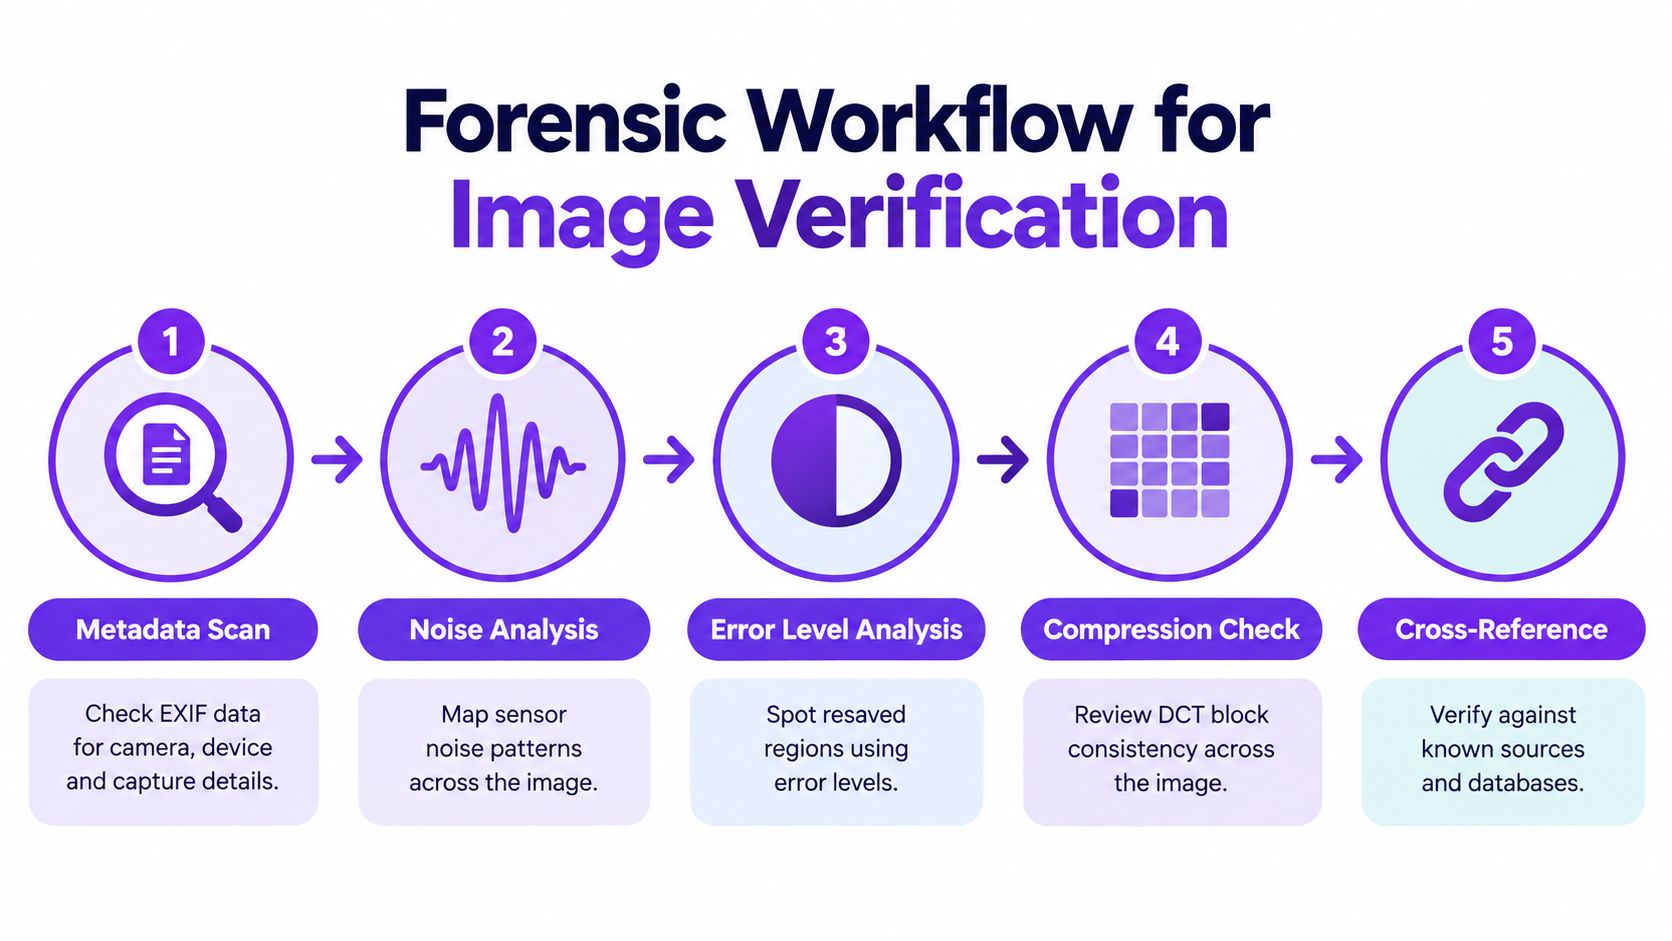
Separate codec history from generation evidence
Keep three analytical tracks:
- Codec track: Estimate JPEG quality, check for recompression, inspect block alignment, and record resizing or format conversions.
- Generation track: Assess independent visual and semantic indicators, including inconsistent lighting, implausible geometry, unnatural textures, or a detector result that remains meaningful after accounting for file history.
- Mixed-origin track: Test whether a real photograph contains an AI-generated or AI-inpainted region instead of assigning one origin to the entire file.
Platform processing can shift detector confidence. WebP compression, resizing, blurring, and screenshot capture each add their own transformations. A screenshot may introduce a new capture layer as well as another encoding stage. The WACV 2025 study on reducing content bias in AI-generated image detection emphasizes aligned compression and resolution conditions. Without that control, a detector may learn format differences rather than generation traces. The WACV 2025 study on content bias and transformed images provides relevant context for platform-processed files.
Report the findings separately. “The file contains anomalies” is often supportable; “the image was generated by AI” may not be. Identify likely compression damage, possible double compression, and independent generation indicators without combining them into one unsupported label.
Reporting standard: If resizing or recompression could explain a finding, state that limitation. An indeterminate result is more useful than a confident label without adequate support.
A Step-by-Step Forensic Workflow for Image Verification
A repeatable workflow protects the evidence from casual handling and keeps the conclusion understandable to someone who wasn't present during the examination. It also prevents analysts from jumping straight to an AI detector before establishing what happened to the file.
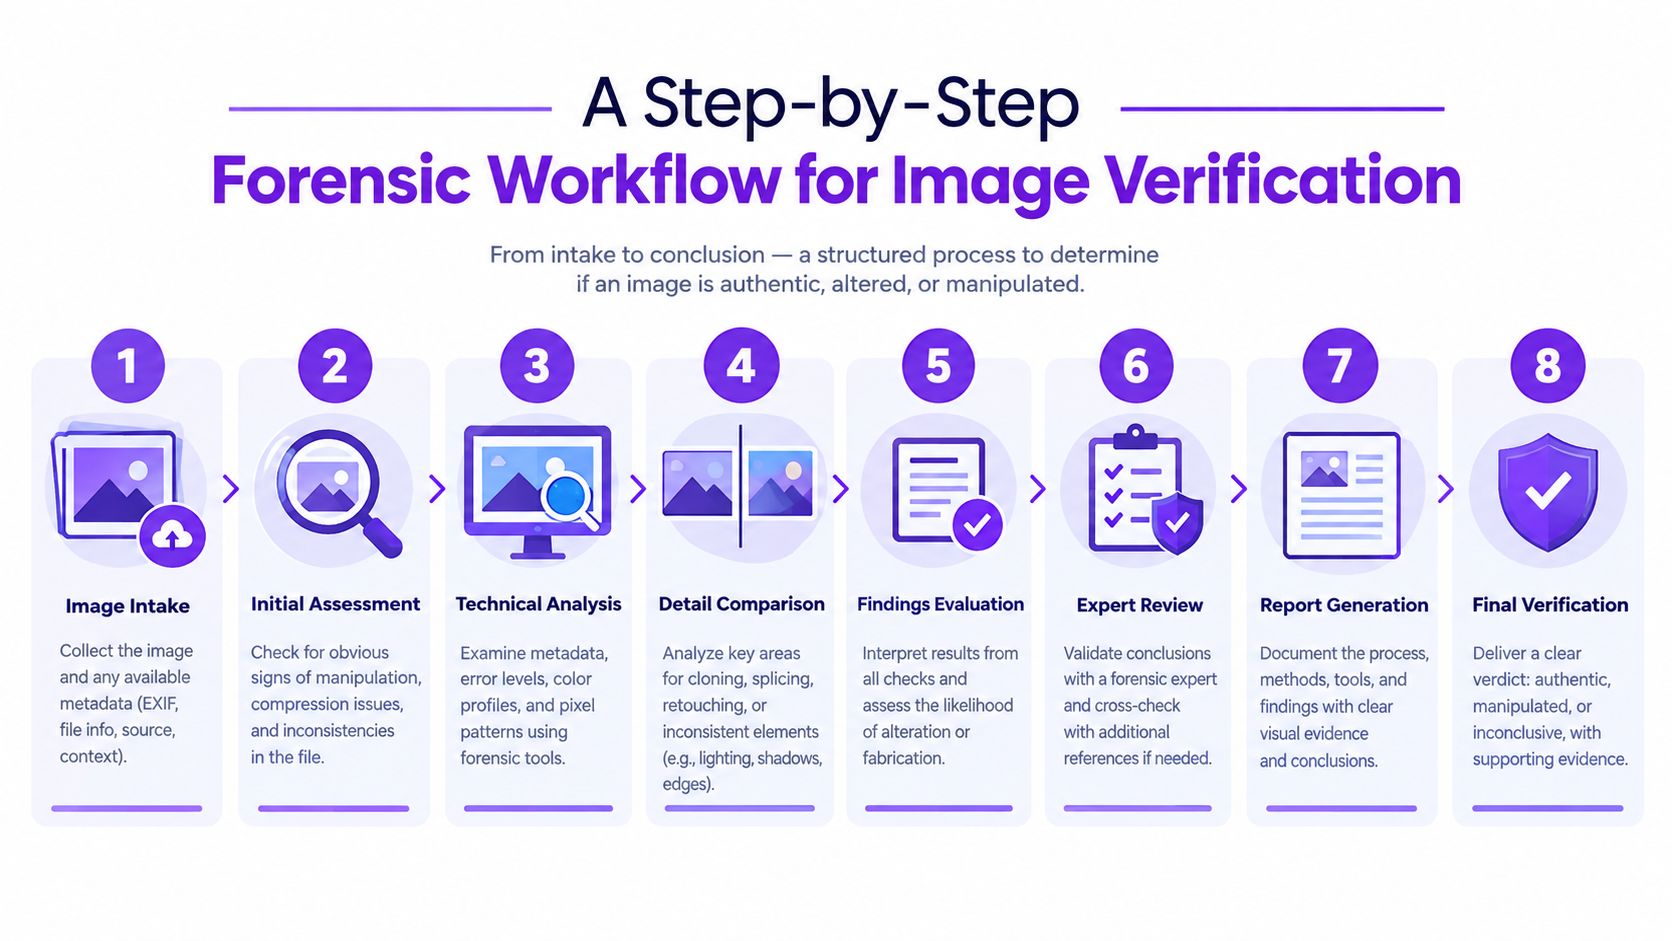
Begin with preservation and provenance
Save the supplied file without editing it. Create a working copy, calculate an internal file identifier if your team uses one, and record where the image came from, when it was received, and whether it was downloaded, forwarded, or captured as a screenshot.
Inspect the container and metadata next. Record dimensions, file type, EXIF fields, software markers, color information, and any obvious mismatch between the claimed origin and the available file history. Treat absent metadata as an absence of context, not proof of wrongdoing.
Move from global to local analysis
Estimate the file's overall compression behavior before inspecting a small region. Look for evidence that the image has been recompressed or passed through multiple encoding stages. Then examine DCT patterns and block consistency across visually comparable areas.
After that, use ELA and noise analysis to locate regions that deserve attention. Compare suspicious areas with nearby backgrounds, object edges, and textures that underwent the same likely export process. Keep screenshots or exported analysis views with notes about the tool, settings, and file version used.
Add independent checks
Automated generation detection can help prioritize review, but it shouldn't replace file analysis. Compare the result with visual geometry, reflections, shadows, text rendering, repeated textures, and known source material. A detector flag that appears only after a platform transformation deserves different treatment from a flag supported by several independent findings.
Finish with a written conclusion that distinguishes observation from interpretation:
- Observed: The region has a compression signature that differs from nearby areas.
- Possible explanation: It may have been inserted, retouched, or separately recompressed.
- Alternative explanation: Platform processing or repeated export may account for the difference.
- Confidence boundary: The file doesn't establish the exact editing operation.
- Next action: Seek the original upload, an earlier copy, or corroborating imagery.
This structure helps a newsroom publish carefully, an educator explain a review to a student, and a moderation team route a difficult file for specialist assessment.
Comparing Forensic Tools and AI Image Detectors
Forensic tools answer different questions, so tool selection should follow the investigation rather than the other way around. A manual analysis suite is useful when the reviewer needs to inspect pixels, metadata, compression behavior, and localized differences. A browser-based detector is more suitable for rapid triage when a team has a large queue and needs to decide which files deserve deeper examination.
Tools such as FotoForensics and Ghiro are often discussed in the manual-forensics category, while AI-driven services focus on estimating whether visual patterns are more consistent with human-created or synthetic imagery. The trade-off is clear. Manual tools expose more of the reasoning but require interpretation. Automated tools produce a faster, more accessible signal, but their output can shift after compression, resizing, or mixed editing.
Match the tool to the decision
| Investigation need | More suitable approach | Main limitation |
|---|---|---|
| Establish file history | Metadata and container inspection | Metadata may be missing or altered |
| Locate local anomalies | ELA, DCT, block, and noise analysis | Ordinary editing can create similar traces |
| Screen a large queue | Automated AI detection | A score isn't proof of origin |
| Support a consequential finding | Multiple methods with documented settings | Requires time and trained review |
| Assess a mixed-origin image | Region-level forensic analysis plus visual reasoning | Whole-image labels can hide local edits |
Privacy also matters. Teams should check whether an uploaded image is retained, reused, or exposed to third parties, particularly when files contain personal data, unpublished reporting, student work, or confidential evidence. A tool's speed is irrelevant if its handling policy conflicts with the investigation.
The best operational pattern is triage, corroboration, and documentation. Use automation to identify files that need attention. Use JPEG image analysis and contextual checks to explain the anomaly. Record the original file, the transformations tested, and the limits of the conclusion so another analyst can reproduce the decision.
An AI detector should therefore be treated as one instrument in a verification stack, not as an authority that overrides compression evidence. A “likely human” result doesn't certify an untouched original, and a “likely AI-generated” result doesn't identify whether the file was fully synthesized, partially inpainted, or distorted by platform processing.
Navigating Limitations and Best Practices for Verification Teams
The hardest files are mixed-origin files. A human photograph may contain AI inpainting, an AI image may receive substantial human retouching, and an authentic image may be repeatedly recompressed until its original traces become difficult to interpret. Traditional assumptions break down when the image has passed through several systems.
False positives become more likely when analysts confuse a file's current appearance with its complete history. Confidence can change after social-media upload, cropping, resizing, WebP conversion, blurring, or screenshot capture. Teams should record those transformations whenever they're known and report when the result becomes indeterminate.
Practical standards by audience
Journalists and fact-checkers should preserve the supplied file, search for earlier versions, compare the image with independent sources, and publish the uncertainty that matters. A compression mismatch may justify further reporting, but it shouldn't be presented as proof of fabrication.
Educators and academic reviewers should distinguish synthetic generation from ordinary image editing. Ask for the original file and creation context where appropriate, and avoid treating a detector output as disciplinary evidence without corroboration.
Trust and safety teams need consistent escalation rules. Route high-reach or high-risk images through layered review, separate whole-image findings from region-level findings, and retain the exact file version used for the decision. Automation can prioritize work, but policy should account for transformed and mixed-origin content.
A defensible result explains both the signal and the uncertainty.
The central discipline is separation. Report what the JPEG structure suggests, what visual analysis suggests, what an AI detector suggests, and where those lines don't agree. That approach is slower than a binary label for difficult cases, but it gives editors, moderators, and investigators a conclusion they can defend.
AI Image Detector offers JPEG analysis that evaluates visual artifacts, lighting inconsistencies, texture patterns, and other indicators of AI generation, returning a likelihood assessment and explanatory result. Use AI Image Detector to add a fast triage layer to a workflow that still checks compression history, platform transformations, and mixed-origin evidence.
