
A Practical Guide to Stable Diffusion Img to Img
If you've ever felt limited by text-only prompts, you're going to love Stable Diffusion's img2img feature. It's a whole different way of working where you provide an existing image to act as a creative starting point. This gives you a remarkable amount of control over the final composition, letting you transform, tweak, or completely overhaul your visuals. For anyone looking to get serious with AI image generation, this is where the real power lies.
Unlocking Creative Control with Img to Img
At its heart, img2img is a collaboration. You bring the initial idea—the source image—and the AI brings its generative power. Instead of describing a scene from scratch, you're essentially telling the AI, "Start with this, but make it that," based on your new text prompt and settings. It’s a far more intuitive and guided process.
This opens up a ton of practical uses that go way beyond just making cool AI art.
- For Designers: Got a rough product sketch? You can use img2img to instantly see it with different materials, colors, or sitting in various environments, all without having to remodel anything.
- For Artists: Take a simple pencil drawing and transform it into a photorealistic masterpiece. Or, apply the brushstrokes of Van Gogh to a modern cityscape photo.
- For Marketers: Need to maintain a consistent visual identity? Apply a specific brand style across a whole library of different source photos, ensuring everything looks cohesive.
The Power and Proliferation of Stable Diffusion
To understand why this matters, just look at the numbers. By 2024, platforms running on Stable Diffusion had churned out a mind-boggling 12.59 billion images. That accounts for about 80% of all AI-generated images online—more than Shutterstock's entire stock library. It's a testament to the sheer scale of creative work this technology has enabled.
Because Stable Diffusion is open-source, it’s everywhere. This widespread access is fantastic for creators, but it also highlights the growing need for verification. The same tools that artists use to create stunning visuals can also be used to generate convincing fakes.
The key takeaway is that the model's flexibility, from realism to fantasy, is something you can directly influence with img2img. A great way to get a feel for this is to just try it out. There are tons of simple guides showing you how to make your photo into anime, which is a classic and fun use case.
As this technology becomes more ingrained in our daily lives, being able to spot the difference between human and AI-generated content is becoming a critical skill. Professionals across media, education, and security are now relying on verification tools to maintain trust in an increasingly synthetic world.
Choosing Your Img2Img Workspace
Alright, so you're ready to dive into image-to-image with Stable Diffusion. The very first thing you need to decide is where you're going to work. This choice really comes down to two main roads: running it in the cloud or setting it up locally on your own machine. Each path has its own set of trade-offs, and the right one for you depends on your technical skills, your computer, and what you’re trying to create.
Cloud-based platforms are by far the easiest way to get your feet wet. Services like DreamStudio, Midjourney, or Playground AI do all the complicated setup for you. You just make an account, pop in your starting image, write a prompt, and see what happens. It’s that simple.
This is the perfect route if you're just starting out or if your computer doesn't have a beefy graphics card. The catch? It usually costs money, either through credits or a subscription, and you often give up some of the fine-tuned control you’d get with your own setup.
The Power of a Local Setup
If you’re the type who wants total control and complete privacy, then a local installation is your best bet. Tools with graphical user interfaces (UIs) like AUTOMATIC1111 or ComfyUI put every single parameter at your fingertips. This lets you build incredibly detailed and complex workflows that most cloud services just can't match.
Running it all on your own hardware means your images and prompts stay on your computer, which is a huge plus for any sensitive or commercial work. The biggest barrier, of course, is the hardware itself. You don't need a state-of-the-art supercomputer, but a good graphics card with plenty of Video RAM (VRAM) is non-negotiable.
Here’s a quick breakdown of what to look for:
- 8GB VRAM: This is a good entry point. You’ll be able to generate standard-sized images and play around with most features without much trouble.
- 12GB VRAM: I'd call this the sweet spot. It gives you the headroom to work with higher resolutions and more demanding models without constantly bumping up against memory limits.
- 16GB+ VRAM: This is where you want to be for serious or professional work, like training your own models or batch-processing huge images.
Once you’ve made the hardware investment, you get unlimited, free image generation and the ability to use any custom model or extension the community comes up with.
Prepping Your Source Image for Success
No matter where you choose to work, remember this: the quality of your output is almost entirely dependent on the quality of your input. Giving the AI a clean, well-composed image is the single most important thing you can do. You’re essentially handing it a strong blueprint to build from.
First, pay close attention to resolution. Your starting image should, ideally, be the same size as the final image you want to create. If you feed it a tiny, blurry photo and ask for a massive, high-res masterpiece, the AI has to guess what all those missing details should be. The results are often muddy and strange.
Pro Tip: Simply upscaling a low-quality image before you start won't cut it. The AI reads the actual details in the source file. A sharp, clear image gives it much better structural information to work with, leading to a far more cohesive result.
Composition is just as important. Stable Diffusion will try to preserve the general layout and shapes from your source image. If your subject is off-center in the original, it'll probably be off-center in the final piece. Use this to your advantage! Frame your source shot exactly how you want the final image to look.
And before you get lost in the creative process, take a moment to confirm you have the right to modify the original image. You can learn more about this in our guide on using a copyright image checker. Trust me, sorting this out upfront can save you from massive headaches down the road.
How to Master Key Img-to-Img Settings
Getting real control over the img2img process means you have to stop randomly dragging sliders and start understanding what each one actually does. These settings aren't just confusing obstacles; they're your creative toolkit. The difference between a lucky accident and a masterpiece is knowing how to use them with intention.
This is where you learn to pilot the AI. By getting a feel for the core parameters, you can guide the model with precision, whether you’re just making a tiny stylistic tweak or completely overhauling the entire concept of your source image.
First, you need to decide where you'll be working. This quick decision tree can help you figure out if a cloud service or a local setup is the right call for your situation.
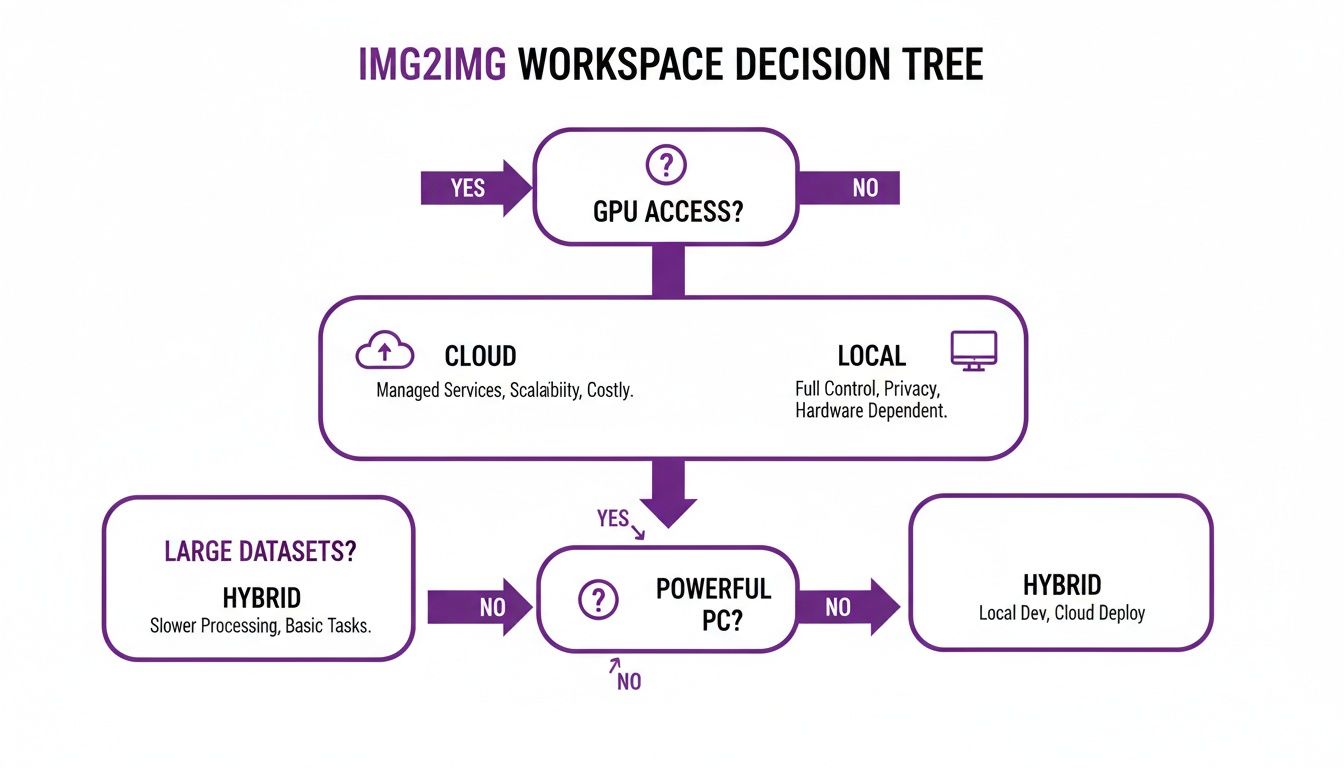
As you can see, cloud platforms are a great starting point if you don't have a beefy graphics card, while installing locally gives you the ultimate control if your PC can handle it.
Denoising Strength: Your Creative Throttle
If there’s one setting you absolutely must understand, it's Denoising Strength. This slider is the single most important control you have—it tells the AI exactly how much to change your original image. Think of its 0.0 to 1.0 range as a creative throttle.
Crank it down to a low value, like 0.1 to 0.4, and you’re telling the AI to play it safe. It will stick very close to the source image, which is perfect for subtle changes. This is your go-to for adding small details, cleaning up imperfections, or applying a light stylistic filter without messing with the composition. The original colors, shapes, and layout stay put.
Push it to a high value, like 0.7 to 1.0, and you're letting the AI off its leash. The original image becomes more of a loose suggestion for composition and color, giving the model huge freedom to reimagine everything based on your prompt. This is what you use for those dramatic transformations—turning a photo into a watercolor painting or evolving a rough sketch into a photorealistic scene.
My Two Cents: I’ve found the magic happens somewhere between 0.5 and 0.75. That range gives you a fantastic balance, allowing for big stylistic shifts while still respecting the bones of the original image. My advice? Start at 0.6 and tweak from there.
CFG Scale: How Closely to Follow the Prompt
While Denoising Strength controls how much to change, the CFG Scale (short for Classifier Free Guidance) dictates how strictly the AI should follow your text prompt. It's basically a prompt loyalty score.
A low CFG Scale (around 3-6) gives the AI more room to improvise. The model will pay less attention to the exact words you used and might generate something more abstract or unexpected. This can be a great way to stumble upon cool visual ideas when you’re not locked into a specific outcome.
On the other hand, a high CFG Scale (say, 8-15) forces the model to stick to your prompt like glue. This is essential when you need the output to nail the specific details you've described. Just be careful not to push it too high (anything above 15) or you risk getting overly saturated, distorted images that look "fried." The AI tries too hard and artifacts start appearing.
- Low CFG (3-6): Best for creative exploration when you want the AI to surprise you.
- Medium CFG (7-10): The sweet spot for most projects. It's a solid balance between following your prompt and producing a high-quality image.
- High CFG (11-15): Use this when you need precise details from your prompt to show up, no questions asked.
Think of Denoising and CFG as a tag team. High Denoising gives the AI permission to change a lot, and a high CFG tells it exactly what to change it into based on your words.
Choosing Your Sampling Method
The Sampling Method, or sampler, is the algorithm the AI uses to clean up the noise and form an image. The technical details can get pretty deep, but what matters to you comes down to two things: speed and quality. While there are dozens of samplers out there, you really only need to know a few to get fantastic results.
Newer samplers are generally much faster and need fewer Sampling Steps to cook up a good-looking image. A "step" is just one cycle in the generation process. More steps can add detail, but they also mean more waiting.
To help you get started, this table breaks down the key parameters and their impact.
Core Img2Img Parameter Effects
| Parameter | Low Value Effect (e.g., 0.2) | High Value Effect (e.g., 0.8) | Best Used For |
|---|---|---|---|
| Denoising Strength | Stays very true to the source image. Only minor changes. | Drastic changes. Source image is just a guide. | Transforming a photo into a painting; complete style changes. |
| CFG Scale | AI has more creative freedom, less prompt adherence. | AI sticks very closely to the text prompt. | Generating images that require specific details from the prompt. |
| Sampling Steps | Faster generation, but potentially less detail or "unfinished" look. | Slower generation, but finer details and more coherence. | Creating final, high-quality images once the concept is locked in. |
This quick-reference should help you make more informed decisions instead of just guessing.
For most of your stable diffusion img to img work, I recommend starting with the DPM++ 2M Karras sampler at around 25-30 steps. It’s an absolute workhorse that gives you amazing quality without the painfully long render times of older methods like DDIM. Once you're comfortable, definitely play around with other samplers—sometimes you'll discover one that gives your images a unique aesthetic you can't get any other way.
Taking Img2Img to the Next Level: Advanced Workflows
Once you get a feel for the basic settings, you can start weaving them together into some seriously powerful workflows. This is where Stable Diffusion img2img stops being a fun toy and becomes a legitimate creative tool. We’re going beyond simple style swaps and into complex tasks that can solve real problems for artists, designers, and anyone creating visual content.
The real magic happens when you combine img2img features like inpainting with smart prompt engineering. It's less about getting a perfect result in one go and more about layering techniques to achieve a polished, deliberate outcome that would be a headache to create otherwise.
Precision Edits with Inpainting
Think of inpainting as your secret weapon for surgical edits. Instead of asking the AI to rethink the whole image, you just draw a "mask" over the specific part you want to fix or change. Stable Diffusion then focuses all its creative energy only inside that masked area, blending its new creation right into the original pixels.
This is incredibly handy for all sorts of practical jobs:
- Object Removal: Got a photobomber in the background or a brand logo you need to remove? Just paint over it, prompt for what should be there instead (like "grassy field" or "plain cotton shirt"), and it’s gone.
- Element Addition: Want to add a flock of birds to an empty sky or a new ring on a model's finger? Mask the spot and tell the AI what to put there.
- Fixing AI Artifacts: This is my go-to for cleaning up AI-generated weirdness. Those classic mangled hands or distorted faces are easy to fix. Just mask the problem zone and let the AI have another go at getting it right.
Expanding Your Canvas with Outpainting
Outpainting is the mirror opposite of inpainting. Rather than changing what’s in the picture, it intelligently builds outward from the edges, filling in the blanks to expand your canvas. You’re essentially telling the AI, "Show me what's just outside the frame."
This is a game-changer for reframing photos or creating bigger compositions from smaller ones. You could take a tight headshot and expand it into a full-body portrait, or turn a standard landscape photo into a breathtaking panorama. The AI studies the existing image and continues the patterns, lighting, and textures to build a seamless, larger picture.
Rethinking Your Prompts for Img2Img
Your text prompt has a very different job in img2img compared to text-to-image. Here, the prompt is a partner to the source image, not the sole director. Your goal is to write something that guides and refines the visual information the AI is already working with.
A classic mistake is to write a prompt that fights the source image. If you feed it a daytime photo of a forest but prompt "a bustling city at night," you'll just get a chaotic mess unless you crank the Denoising Strength way up.
Instead, think of your prompt as a set of modification instructions.
Key Insight: A great img2img prompt describes the target style or content while respecting the source composition. Focus on adjectives, artistic styles, lighting, and specific details you want to add or change, not on describing the entire scene from scratch.
For instance, if your source image is a basic photo of a car, a good img2img prompt wouldn't just be "car." It would be something like: "concept art of a futuristic sports car, sleek, aerodynamic, glossy red paint, studio lighting, octane render." This tells the AI how to transform the car that's already there.
Negative prompts are your best friend here. Use them to steer the AI away from common blunders. A simple but effective negative prompt like "ugly, tiling, poorly drawn hands, poorly drawn feet, out of frame, extra limbs" will instantly improve the quality of your results.
Finally, don't forget prompt weighting. You can fine-tune your control by adding emphasis. In many UIs, wrapping a word in parentheses, like (masterpiece), gives it more influence, while using square brackets, like [blurry], reduces its importance. This lets you dial in the exact elements you care about most.
As AI image generation becomes more common, understanding these nuances is crucial. The scale is mind-boggling; as of late 2023, people were creating over 34 million AI-generated images every single day. The market is exploding, with some projections expecting it to top $1 billion by 2030. This massive output is exactly why verification tools are now so essential for professionals who need to confirm an image's authenticity. For a deeper look into how images are being altered, check out our guide on AI image manipulation.
Why Verifying AI-Modified Images Matters
As the creative power of stable diffusion img to img gets into more hands, the line between an original photograph and an AI-modified one is getting seriously blurry. This isn't just a novelty; it creates a real need for verification. Being able to tell an image's true origin has gone from a niche skill to an essential one for professionals everywhere.
Think about journalists, fact-checkers, and legal teams—the stakes for them are incredibly high. A single, subtly tweaked image can spark a misinformation campaign, throw digital evidence into question, or ruin a reputation in an instant. The responsibility to validate digital media has never been more important.
Recognizing the Telltale Signs of AI
AI-generated images are getting frighteningly good, but they still aren't perfect. Diffusion models like Stable Diffusion build images in a way that can leave behind subtle digital fingerprints. These aren't glaring mistakes, but tiny inconsistencies that specialized tools are built to find.
Keep an eye out for these common tells:
- Illogical Lighting and Shadows: Look closely at how light behaves in the image. AI often messes up shadows, making them inconsistent with the light source, especially in complex scenes.
- Unnatural Textures: Surfaces can look too perfect. Skin might seem waxy, wood grain might lack randomness, or fabric could have a strange, repeating digital smoothness to it.
- Warped or Inconsistent Patterns: Check detailed patterns on things like clothing or buildings. The AI might struggle with perfect symmetry, causing lines to bend or warp in ways that don't make physical sense.
The reason these tells exist comes down to how Stable Diffusion works. It generates visuals through a process of iterative denoising, which can accidentally introduce these signature flaws. You’ll see it in everything from wonky anatomy and gibberish text to mismatched shadows. Since over 80% of AI images originate from Stable Diffusion or a similar model, detection tools trained on these specific artifacts can be remarkably accurate. You can find more technical statistics on aistratagems.com that dive into the model's prevalence.
The Role of AI Detection Tools
Trying to spot these artifacts by eye is both time-consuming and unreliable. It's just not practical. This is where dedicated AI detection tools come in. Instead of just guessing, these platforms analyze an image at the pixel level, searching for the underlying mathematical patterns that scream "AI."
This screenshot shows the clean interface of an AI Image Detector. You just upload an image and get a clear analysis.
The tool gives you an immediate verdict, classifying the image on a simple spectrum from "Likely Human" to "Likely AI-Generated." It takes the guesswork completely out of the equation.
For professionals, this provides a fast, scalable way to check digital content. Just look at these real-world scenarios where verification is an absolute must:
- Journalism: A news outlet gets a photo from a protest that’s going viral. Before it goes to print, they run it through a detector to ensure it hasn't been manipulated to mislead viewers.
- Education: A professor wants to confirm a student's digital art submission is their own creation, not just a quick AI prompt, to maintain academic integrity.
- Legal Proceedings: A legal team is handed photo evidence. They have to authenticate it to prove it hasn’t been doctored, which could make or break a case.
In all of these situations, having a reliable way to check for AI usage is fundamental. The point isn’t to vilify AI art, but to establish a trusted standard for verification now that we're swimming in synthetic media.
Common Questions About Stable Diffusion Img to Img
As you start getting your hands dirty with Stable Diffusion img2img, you'll inevitably run into some head-scratchers. Why do my results look so muddy? How do I get a specific effect without losing my original composition? What’s the real difference between a Denoising Strength of 0.6 and 0.8?
This section is all about tackling those common hurdles. Think of it as your field guide for troubleshooting. We’ll break down some of the more confusing parts of the process and offer clear, actionable advice to help you get the results you're after.
How Much Should I Change the Denoising Strength?
This is probably the most common question I hear, and the honest answer is: it completely depends on what you’re trying to do. There’s no magic number here. Instead, you need to think about the trade-off between respecting your original image and letting the AI get creative.
Here's how I break it down in my own projects:
- Subtle Enhancements (0.1 - 0.4): Stick to this range when your source image is already in great shape and you just want to add a little something extra. This is my go-to for upscaling, adding fine-grained texture, or applying a very light artistic filter. The core composition stays firmly intact.
- Creative Transformations (0.5 - 0.75): This is the sweet spot and where I spend most of my time. It gives you the perfect balance for significant stylistic changes—like turning a photo into a vibrant watercolor painting—while still keeping the fundamental structure and layout of the original image recognizable.
- Total Reimagination (0.8 and above): Ready to get wild? Cranking the Denoising Strength up this high tells the AI to use your source image as more of a loose suggestion than a strict blueprint. The final result will be almost entirely guided by your text prompt, often leading to some wonderfully unexpected creations.
Can Img to Img Recreate a Specific Person's Face?
Not reliably, at least not on its own. While standard img2img is a master of mimicking composition, color, and style, it really struggles with holding onto a specific facial identity from just one photo. The denoising process naturally generalizes features, so you'll often get a face that looks similar but is clearly not the same person.
To get consistent faces, you need to bring in more advanced tools. The most common approach is to train a custom model, like a LoRA (Low-Rank Adaptation), using a dozen or so photos of the person's face. Once you have that specialized model, you can then use it within your img2img workflow to place that specific person into entirely new scenes and styles.
The technology behind all this is moving incredibly fast. If you want a deeper understanding of where these models come from, it's worth learning about the Stability AI platform, which is the driving force behind Stable Diffusion's development.
Why Do My Images Look Blurry or Distorted?
If your outputs are a blurry, pixelated mess, don't blame the AI just yet. The problem usually boils down to one of a few common mistakes. Before you tear your hair out, run through this quick troubleshooting checklist.
- Low-Quality Source Image: This is the #1 offender, hands down. Garbage in, garbage out. If you start with a tiny, blurry, or heavily compressed image, the AI simply doesn't have enough good information to build upon. Always start with the highest quality source you can get.
- Mismatched Resolutions: Make sure your output dimensions are the same as your input dimensions. If you feed the AI a 256x256 source and ask for a 1024x1024 output, you're forcing it to guess what fills the gaps. That guesswork almost always leads to a distorted, messy result.
- CFG Scale is Too High: Pushing the CFG Scale much past 15 can literally "fry" your image, creating bizarre color artifacts and oversaturation. It’s the AI trying too hard to follow your prompt, and coherence suffers. Pull it back into the 7-12 range for a much more stable result.
- Not Enough Sampling Steps: Some samplers need more time to cook. If you're using fewer than 15 steps, the image can look unfinished or muddy. If things just don't look right, try bumping the step count up to 25 or 30 and see if that sharpens things up.
By walking through these common culprits, you can solve the vast majority of quality issues and get back to creating amazing images.
Ready to verify your images with confidence? AI Image Detector offers a fast, free, and private way to determine if an image was created by AI. Get a clear verdict in seconds and protect your work from misinformation. Try it now at https://aiimagedetector.com.